You use masking.

It's a wonderful method to use. In effect, whenever using Photoshop, you should never do anything that cannot be undone at some other stage. That's the professional approach. With multi-layers, multi-effects layers and masking, this is achieved.
When you select the area you wish to diminish in transparency whilst that layer is selected in the Layers window, go to the Layers window and select
Add Layer Mask. You will suddenly see the area that was selected vanish. If it was the opposite, then undo the add mask layer, and choose Select Inverse (Command-Shift-i on Mac, I presume Control-Shift-i on Windows.) Then re-do the add mask layer.
Now if you wish to adjust the area of transparency, this is the fun part. lol

From the Layers window, select the Channels tab window. Then select the
Layer Mask layer so it is active. Click the eye on to the left of the layer mask so that the area that is transparent turns Red. You can use a black or white pencil (or similar tool) to paint the area. White will undo the transparency. Black will extend the area of the transparency. Now if you wish to make part of the area partially transparent, then change the pen's opacity from 100% down to whatever you wish to get the effect you want.
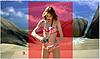
. In my example image (#4.), I could put partial transparency around the edges of the hair and perhaps even some parts of her upper body to let the background partially show through to give the impression of background glow, etc. so it looks more-so as though it realistically mellows in with the background picture layer. Doing so really does help to make the upper layer image look as though it's a part of the background scene (and would rid of the sharp edges.) Though I did not do it in this example. It took me 5-10 minutes. Took me much longer to do the sample images lol.
With Layer Masks, you can always go back and re-adjust the mask at a later time such as another day. The same applies for applying effects such as blurr or color changing. These should all be used in Effects Layers, never used directly onto the original image.
1. Select image. (You may see the faint selected area around the body.) ie: Do your selection around what you wish to show or not show from the upper layer.
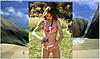
(Click the thumbnail Sample images to see larger view, click again to see in it's own window.)
2. Inverse selection (if necessary.)
 3.
3. Create a Mask from the selection.
(Click to see the animated GiF image.)
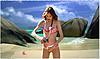
4. Result is transparency from the selected (or unselected) area around the main figure.
 5.
5. To clean up the image, go to the Channels tab, select the Layer Mask, then use the Pen tool to adjust the transparency around the image.
 (Click to see the animated GiF image.) 6.
 Shows the Layer Mask visibly selected on main screen, gives a red area showing the transparency. Pencil coloured white will remove transparency, black will add more transparency. Use the Pen's opacity if you wish partial transparency of any parts. A gradient layer can be used also for a larger area of fading transparency but that is more complicated. You can instead select the Layer Mask portion attached to the upper layer instead of using the channels for fine tuning the masking with a pen.
The sample image I chose was larger than I thought, I should have chosen a smaller image so I could put it all into a Gif animated image (both pictures had been sitting forgotten on my desktop for over a year lol.) By the way, I always save my master work using TIFF, it has always been a superior format to Photoshop PSD. And non-flattened TIFF can also save to a smaller size than PSD if you use both LZW and ZIP compression (maybe half or third the size of PSD.)